Once you've built your CLI tool and you're happy with the functionality, you want to share it with others. This is called distribution. You'll need the Apple Developer Program membership ($99) to perform "Software distribution outside the Mac App Store" as per Apple. This post goes over making a CLI tool in Xcode, including Building, Signing and Notarizing, on macOS Big Sur.
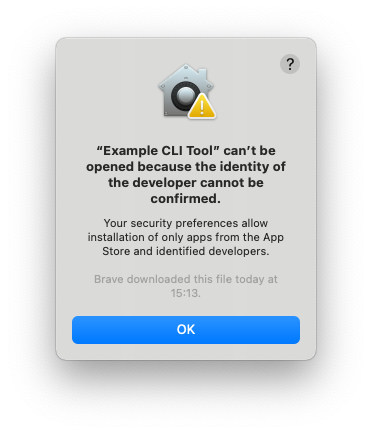
When users download your app from outside the App Store, macOS (GateKeeper) adds an attribute to the file (the Quarantine flag). When users try to launch the downloaded application (or cli tool), GateKeeper checks that the files meet certain requirements, and either allows the user to launch the app, or restrict the launch and shows the following UI instead:
When running in the terminal, you'll get:
> ./Example\ CLI\ Tool
zsh: permission denied: ./Example CLI Tool
That's not a great user experience.
Tip: Right click > Open to bypass GateKeeper app to launch the app anyway, unfortunately we can't expect users to do this, so thats why we notarize our app. You can check this quarantine flag in the terminal using the xattr (extended attribute CLI) tool:
> xattr -p com.apple.quarantine Example\ CLI\ Tool
0081;605f4bb1;Brave;39D0D1E9-5786-4D0E-9773-9EDB45F08C69
The above output states the flag is 0081, the date is 605f4bb1 which translates to GMT: Saturday, 27 March 2021 15:13:53 and is displayed on the UI alert, it was downloaded using the Brave browser and has a specific UUID. You can convert that Hex date into a human readable one using EpochConverter.
These requirements for a successful launch are seem to be:
- Application installers (.
pkg) and their binaries (inside the .pkg) need to be signed by the developer team to ensure they come from a specific developer team and not just created by some random person pretending to be. You sign things with certificates, not a pen. - Applications files (e.g. installers, apps) need to be notarized by Apple to ensure they are trusted. This process involves uploading it to the server through your developer account. The binaries (inside the .pkg) don't need to be.
- Applications need to have the hardened capability (this is a flag set on the built executable), which limits the access of the executable, which guarantees that the application doesn't have access to certain things without permission. On Xcode, this is an opt-in feature (capability) as opposed to opt-out.
- Info.plist must be present with the executable, either in a parent directory or embedded in the executable. Just having notarization and signed apps will not prevent your app from being quarantined by GateKeeper. If your installer places a folder in the users machine, then you can just put the Info.plist in that folder. However, in this project, we currently just place 1 file in the user machine, in
/usr/local/binso there is no place to put the Info.plist. We can embedInfo.plistinside the executable instead, done through Xcode project settings.- Note for future development: If going to make the installer install a directory on the users machine, you'll need to add a symbolic/ soft link in
/usr/local/binpointing to executables in your directory. Otherwise the user won't be able to use it from their terminal since the executables aren't in the path.
- Note for future development: If going to make the installer install a directory on the users machine, you'll need to add a symbolic/ soft link in
XCode vs. Swift Package ❌
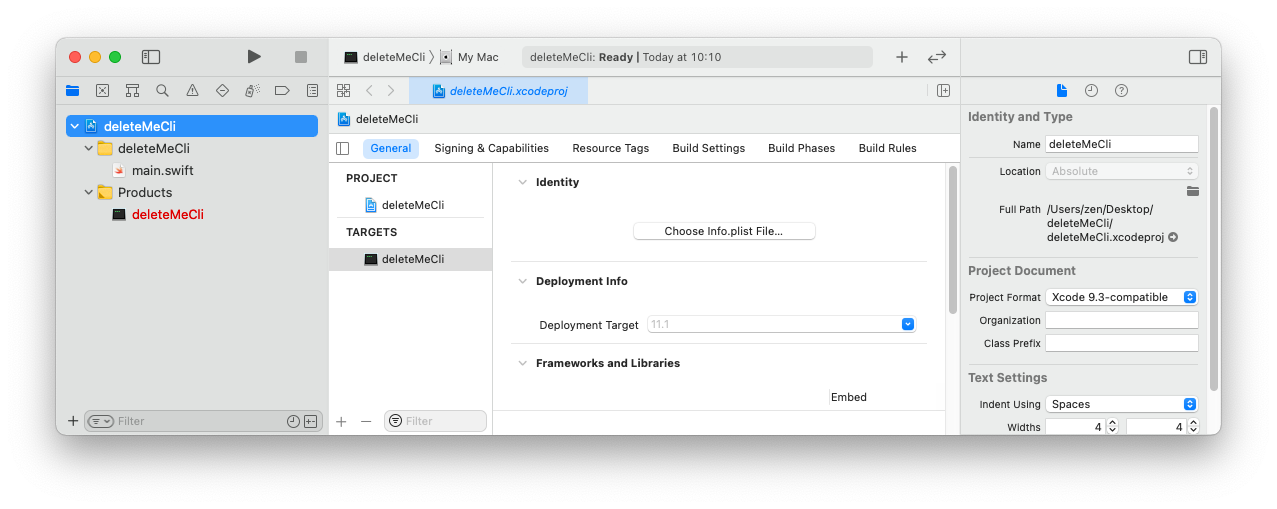
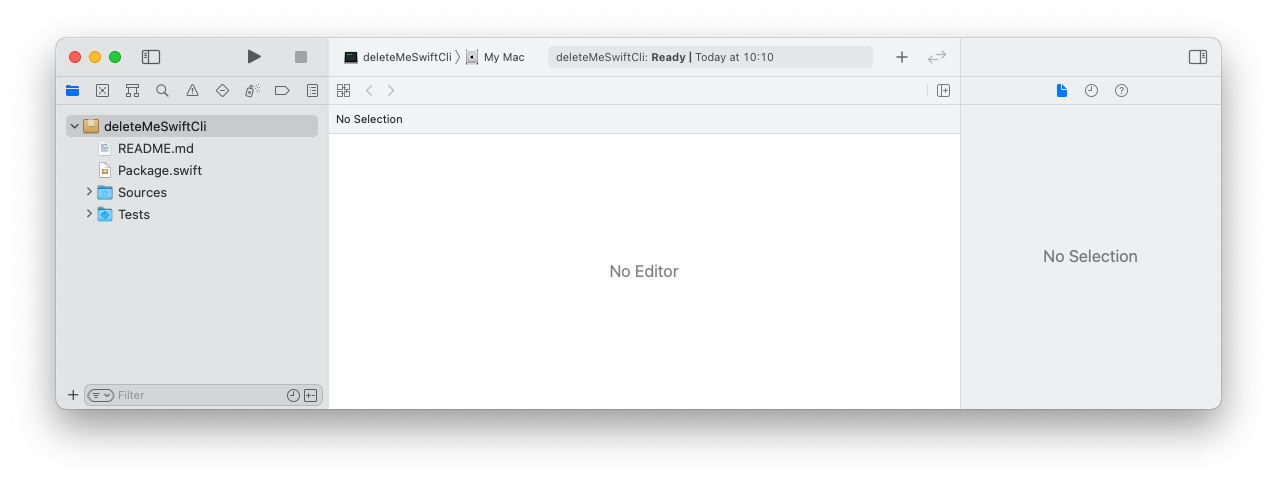
There are 2 proper ways of creating a CLI tool for macOS. I prefer using a Xcode project because of the extra GUI features, all those Project settings tabs: General, Signing and Capabilities, Build Settings, Build Phases and more. You get No Editor in a Swift package in Xcode. Some trade-offs:
-
Xcode project. Xcode can be helpful in learning and understanding the steps in the entire process, as opposed to typing everything in the terminal. Unfortunately, an Xcode project doesn't build very well with
xcodebuild clean build, so you'll need to use Xcode for building the application.xcodebuilddoesn't build Xcode projects very well? What's it for then?? I don't know, I've tried to build a few applications usingxcodebuildand either I don't know how to use it, or its an extremely neglected tool lacking in documentation.
-
Swift package: If we use the swift CLI to create a swift package. We won't do this, but these are the getting started steps:
mkdir projectName, thencd projectName, thenswift package init --type executable, then double clickpackage.swift(Open it with Xcode). This is nice in that the folder is more organised, e.g. it hasSources/andTests/. I needed to restart Xcode because no files were showing up. This does work well withswift build, so building the package is easy on the mac terminal. Unfortunately, Xcode is much less helpful.
Create Xcode project 👷♀️
Use Xcode > File > New > Project... > macOS > Command Line Tool template to create an Xcode project.
Swift Tools Support
What's Swift Tools Support? In the readme, it says "Contains common infrastructural code for both SwiftPM and llbuild.", however I prefer Federico Zanetello's description of it:
these modules offer powerful abstractions for common [CLI related] operations.
Add Swift Tools Support
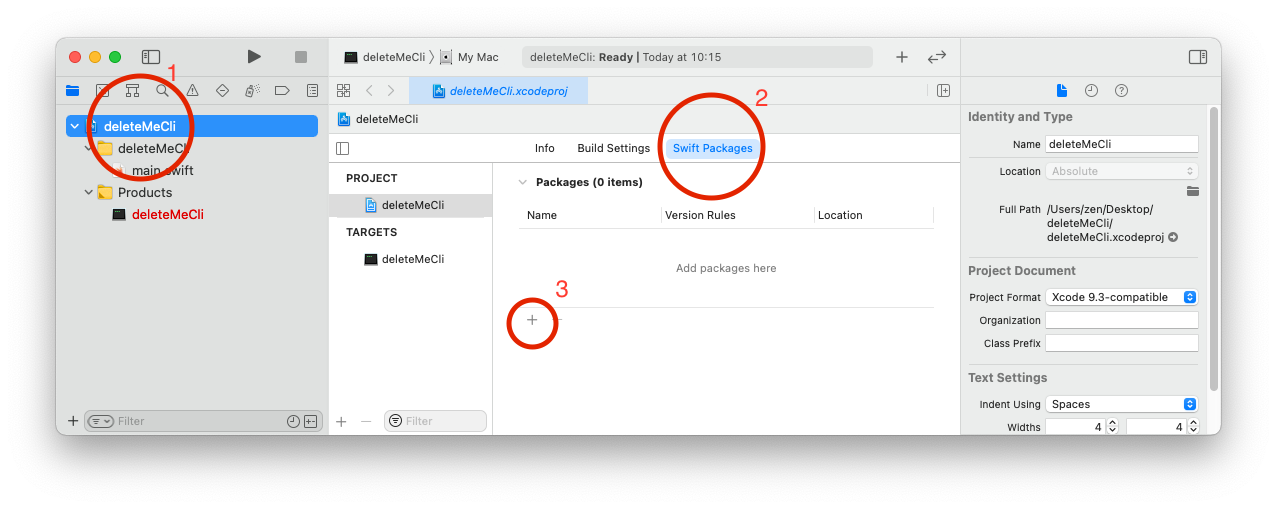
-
In the search bar (package repository URL), add the github URL: https://github.com/apple/swift-tools-support-core
-
In the next window, leave them to the default
Rules/ settings, press Next -
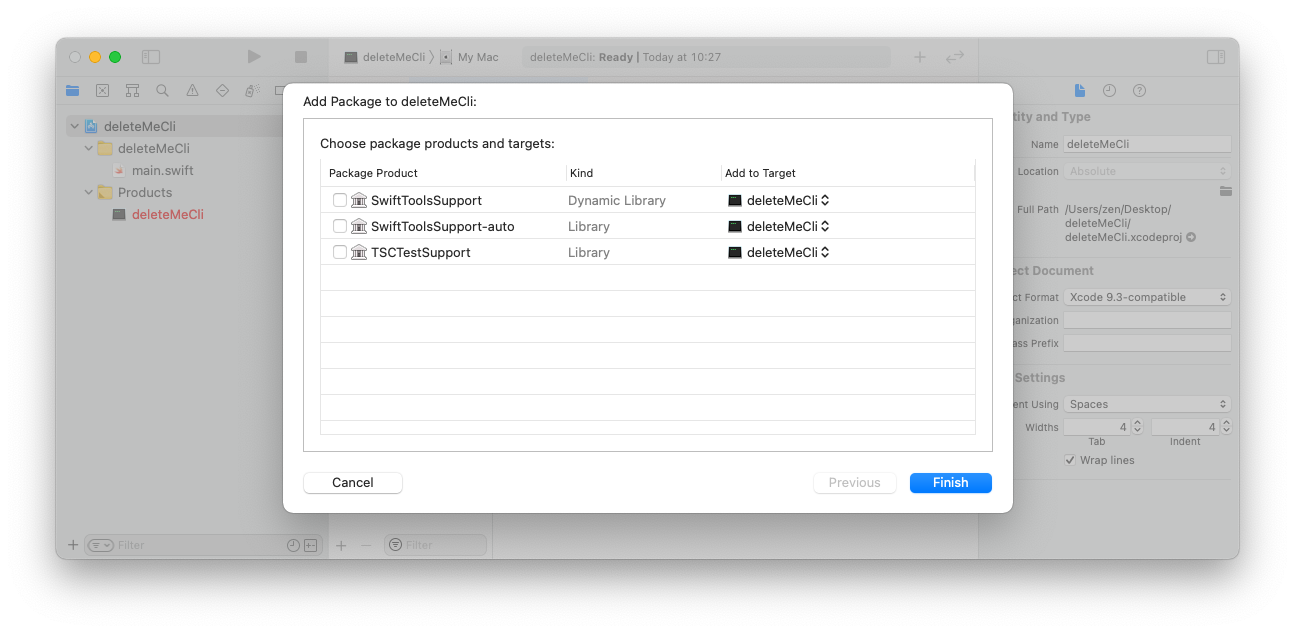
Pick
SwiftToolsSupport-auto, this is important for the binary since we want aLibrary, not anon Dynamic library. This allows the binary to be standalone, without needing extra files.-
-
Optional: What's this dynamic and static linking?
-
If you look in
SwiftToolsSupport'spackage.swift, you'll see these package products described. The difference between-autoand without,SwiftToolsSupporthastype = .dynamic, which means this dependency will be dynamically linked.-automeans let the swift compiler decide what to do: it conveniently chooses the static linking, we want this. Find more here. You can change this later in the project settings. -
    .library(
        name: "SwiftToolsSupport",
        type: .dynamic,
        targets: ["TSCBasic", "TSCUtility"]),
    .library(
        name: "SwiftToolsSupport-auto",
targets: ["TSCBasic", "TSCUtility"]), -
In static linking, all code, including shared libraries are bundled in your executable, when dynamically linked, they have to be added (linked) at runtime. I'll prefer static linking because I want my compiled CLI tool to be standalone, even though it might make the binary bigger.
-
Stack Overflow question: Static linking vs dynamic linking
-
-
And also try
man dyldin the terminal to get the man page for the macOS dynamic linker./// A library's product can either be statically or dynamically linked. It
/// is recommended to not declare the type of library explicitly to let the
/// Swift Package Manager choose between static or dynamic linking depending
/// on the consumer of the package.
taken from https://docs.swift.org/package-manager/PackageDescription/PackageDescription.html
-
-
Now that you've added the repo, you can expand the dropdown menu in the file list (Project Navigator) and read the
package.swiftfile for yourself. I recommend cross referencing withPackageDescriptiondocs.
⌨️🎨 Write some code 🚀🌈
Federico's post has a great section called "Common Patterns" here, including exit codes, system modules, launch arguments, iterative scripts, environment variables, pipeline messages, async calls, input parsing, and progress animations. Please have a read there, to make your CLI tool conform to expected CLI practices.
Signing and Notarization ✍️
Set up your machine/ Xcode
Generate Developer ID certificates
You need the account holder of the Apple developer team to create 2 certificates for you, Developer ID Installer and Developer ID Application.
- What is a Developer ID certificate?: They are certificates for distribution (not developers...) to identify themselves (sign their products) for delivery outside the App Store. More info here. This is distinct to Development Certificate. There are 2 types:
- You need the
Developer ID Applicationcertificate to sign the application/ executable - You need the
Developer ID Installercertificate to sign the installer - One Apple account (e.g. An account which costs $100/year) can create a maximum of 5 Developer ID installer certificates and 5 Developer ID application certificates. Personally, I would have named them Distribution ID, not Developer ID. To summarize, all developers get a Development Certificate, but there's no way all developers get a Developer ID certificate.
- You need the
- Create the certificate, account holders usually already know how to do this on either Xcode Guide or developer.apple.com Guide
Add certificate to keychain
Double-click/ open the 2 files provided by the account holder. They've had to password protect the certificate when they generated it, so you'll need it to unlock this file. This password is not needed anymore once its in the keychain. You can delete the downloaded file they gave you too.
Configure the Xcode project for release
-
Embed
Info.plist:You need Info.plist embedded in the executable. In the target or projectBuild Settings,-
Search for
Info.plist, and you'll seeCreate Info.plist Section in Binary. Set this toYes. -
Then, create an
Info.plistsomewhere in your project (I recommend the root of the project) which has at least 3 items,CFBundleIdentifier,CFBundleName, andCFBundleShortVersionString. I took this requirement from Howard Oakley's blog post:<?xml version="1.0" encoding="UTF-8"?>
<!DOCTYPE plist PUBLIC "-//Apple//DTD PLIST 1.0//EN" "http://www.apple.com/DTDs/PropertyList-1.0.dtd">
<plist version="1.0">
<dict>
<key>CFBundleIdentifier</key>
<string>com.example.example-cli-tool</string>
<key>CFBundleName</key>
<string>Example CLI Tool</string>
<key>CFBundleShortVersionString</key>
<string>1</string>
</dict>
</plist>- Howard called them
Bundle Identifier,Bundle NameandBundle version string (short). Those are the human readable strings which Xcode shows you when it sees the "raw strings" in the.plistfile. Which is actually just an.xmlfile. Nothing special.
- Howard called them
-
Set
Info.plistFile to the path, for example$(PROJECT_DIR)/Info.plistif you placed this in the project root directory. Xcode will convert this into its absolute path in the UI, you don't write the absolute path yourself.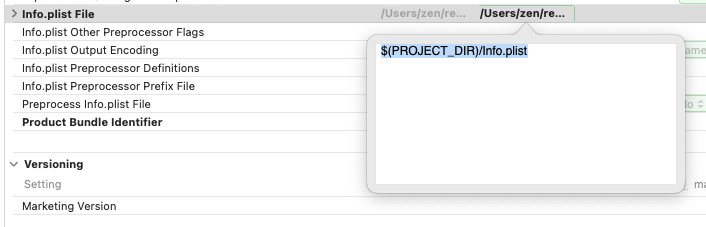
-
-
Signing configuration: In
Signing and Capabilities- Don't 'automatically manage signing'. Uncheck this.
- Set the correct team (your team)
- Update the correct bundle identifier
-
Hardened Runtime: In
Signing & Capabilities, Click+ Capabilityand select Hardened Runtime. Leave it to default settings.
Create an Archive
- Click
XCode menubar>Product>Archive. Wait for the archive to complete, and theOrganizerwill open. You can also open it withXcode menubar>Window>Organizer>Archives - Click
Distribute Content>Built Products> Export it as abuildfolder.
Quick check: Is your executable signed?
Make sure executable was signed: codesign -dv --verbose=4 "build/Products/usr/local/bin/Example Cli Tool"
Build package/ installer
pkgbuild --root build/Products \
           --identifier "com.example.example-cli-tool" \
           --version "1.0" \
           --install-location "/" \
           --sign "Developer ID Installer: Team Name (Team ID)" \
           "Example CLI Tool.pkg"
- The
--rootfolder needs to have the files arranged in the way you want it to be installed on your users device. - Notice the install location is
/. This is because/usr/local/binis already set as an Installation Directory in the Xcode project. If we did them in both places, you'll get/usr/local/bin/usr/local/bin/ROOT_DIRECTORY_CONTENTS. - The
--signvalue (i.e."Developer ID Installer: Team Name (Team ID)") can be found inKeychain.app: but look specifically for the certificate with Installer, which you should've created (or the account holder gave you). - You can rust pre- and post- install scripts if you use
--scripts build/Scripts. Readman pkgbuildfor more details. This is not necessary for the most basic app, since we bundle all files needed into this one binary, and it sits inside/usr/local/bin, which is already on your macOSPATH. - Alternative: Build package/ installer: use Packages
- Using the Packages app, we can configure the destination of each file in our program through a GUI. We might want to put some files in
/usr/local/bin, a directory in/usr/local, etc. It also has a CLI, but if we can get away with not using third party app, we should. - Then sign the
.pkgfile:productsign --sign "Developer ID Installer: Team Name (Team ID)" "Example CLI Tool.pkg" "~/Desktop/Signed-Example CLI Tool.pkg"
- Using the Packages app, we can configure the destination of each file in our program through a GUI. We might want to put some files in
Quick Tests
Make sure installer works: Lets see the installer does its job, before playing around with GateKeeper and Notarization. Run the .pkg file generated. You should be able to run `` from any directory. You'll need a fresh terminal (restart it).
Notarization hasn't completed: I've got three ways to check:
-
> spctl --assess -vvv --type install "Example CLI Tool.pkg"
Example CLI Tool.pkg: accepted
source=Notarized Developer ID
origin=Developer ID Installer: Team Name (Team ID) -
> xcrun stapler validate "Example CLI Tool.pkg"
Processing: Example CLI Tool.pkg
Example CLI Tool.pkg does not have a ticket stapled to it. -
My favorite: Drag the
.pkgfile into a new browser window, and re-download it. Now try to open it, it should say:“Example CLI Tool.pkg” can’t be opened because Apple cannot check it for malicious software.Even the Apple don't know about this, they suggest one of 2 ways to trigger quarantine:- Email the app to yourself and use the copy that Mail downloads.
- Host the app on your own local or remote server and use the copy that Safari downloads.
Generate an app-specific password on Apple ID
- To notarize the app, we could use, for example:
xcrun altool --notarize-app ... --password "SENSITIVE_APPLE_ID_PASSWORD" ..., but this reveals the password. Instead, we can add the password to the Apple keychain and refer to it asxcrun altool --notarize-app ... --password "@keychain:ITEM_NAME" .... - Create an app specific password on https://appleid.apple.com/ > Security >
APP-SPECIFIC PASSWORDS> ClickGenerate Password…. Give it a label that makes sense to you, e.g.MacBook Pro 16"orMac M1 Mini. This name is just for labelling it in your Apple ID account. You might want to revoke in the future when you're not using that password anymore. - Open
Keychain.app - Click File > New Password Item
- Keychain Item Name:
Apple ID(or any name you prefer). You'll refer to this password item with e.g.@keychain:Apple ID. - Account Name:
$APPLE_ID_EMAIL, set this to your Apple ID email. - Password: The app password generated from https://appleid.apple.com/ mentioned before.
- Keychain Item Name:
- Note: If editing an existing password item, its the
Wherefield which matters, not theNamefield.
Notarize package
- To notarize the installer (
.pkg). A previous blog post mentioned that you need a Developer ID Distribution signature but this is not necessary.
xcrun altool --notarize-app \
             --primary-bundle-id "com.example.example-cli-tool" \
             --username "apple_id_email@your_domain.com" \
             --password "@keychain:Apple ID" \
             --asc-provider "APPLE_TEAM_ID" \
             --file "Example CLI Tool.pkg"
- Where do I get
asc-providervalue? It's the team ID you're in, you can find it in the developer.apple.com website, or on your certificate, or run the following command:xcrun altool --list-providers --password "@keychain:Apple ID" --username "apple_id_email@your_domain.com" - Check for completion: Get your request uuid from the output of the above command. You have to wait until the status message is:
Status: success, you getStatus message: Package Approved. You also get an email about the success. I am pretty sure you need to get the success response before you try doing the below stapling step.
REQUEST_ID=SET_YOUR_REQUEST_ID_HERE
xcrun altool --notarization-info "$REQUEST_ID" \
             --username "apple_id_email@your_domain.com" \
             --password "@keychain:Apple ID"
- Staple the notarization ticket to the pkg file with
xcrun stapler staple "Example CLI Tool.pkg" - Quick tests: You can verify Notarization ticket was stapled onto your installer or executable:
xcrun stapler validate example_cli.pkg- or
spctl --assess -vvv --type install example_cli.pkg
Release
You can distribute this app through Github, your personal website or other places. Users will enjoy the lack of GateKeeper UIs.
Other resources
Have a read of these resources for more context:
-
Building and delivering command tools for Catalina was useful in that it mentioned
Info.plistwas a requirement, and demonstarted that CLI tools can be build through Xcode. However, it uses thePackages.appapplication instead of using the command line. My post will show both ways: using Xcode with First-party CLI tools, and also briefly onPackages.app -
I found "notarize a command line tool" very useful, but unfortunately it creates a swift package instead of an Xcode project. Therefore, a lot of other Apple and Xcode guides are not relevant. You're in the dark if things go wrong, especially since swift package manager hasn't been around as long as Xcode. This article also goes to say certain things in Howard Oakley's post are not needed, but I disagree.
Questions
Feel free to comment on this page, I'll get a notification about it and do my best to reply. I found working through notarization has been challenging and interesting, though I am not sure everyone will enjoy it.